Sunday 17 June 2012

Joystick test application (Qt + SFML) [Windows/Linux]

Previously, a demonstration for joystick control was published. It was a demo that made use of Windows DirectInput COM-library with Qt to retrieve the data from joystick - buttons' state and axes positions. Since DirectInput is not a cross-platform library, a new cross-platform demo, based on SFML library is prepared (library has a very liberate license).

How demo works.
The main class of this demo is XInput (include header xinputGamepad.h). It is instantiated and then initialization method initInput(joystick_id) is called, where joystick_id is the index of a joystick in the system starting from zero. Then a timer is set up to generate timeout event every 15 milliseconds (smaller values increases refresh rate and responsiveness), where update() method is called, and joystick state is retrieved using getHorizontal(), getVertical(), isKeyPressed(key_id)getRawAxis(axis_id) and other class functions. 


  Download link:
       application demo (zip): Public_QtJoystick-SFML-Win32-386 - version 0.3a [Win32/i386] - 5.91 MiB
       source code (zip): Source_QtJoystick-SFML - version 0.3a - 233 KiB

    It is written with Qt 4.8.1 for Desktop. Source code is available for download and use under the LGPLv2 or MIT license.

  Usage:
1) Download Public_QtJoystick-SFML.zip archive
2) Unpack it with zip extractor
3) Plug in the joystick (if it isn't plugged in yet)
4) Run QtJoystick-SFML

If you don't have a joystick yet, but want to test the application, there is a joystick emulator for Windows PPJoy (download link, git repository). If you know keyboard/mouse-to-joystick emulator for Linux, please post it in the comments.


Wednesday 26 October 2011

The combined usage of a Gyro and Accelerometer

A new explanatory article have appeared on the ITE Project wiki. It provides mathematical background for linking together Gyro and Accelerometer readings in order to determine the robot's 3D motion trajectory.

Navigation Module - Mathematical Background

Sunday 4 September 2011

DXF writer library [C++]

This is a header-only C++ library for generating Autodesk DXF files. I have used it in a laser cutting application to generate an arbitrary contour. The original idea is taken from here. Here is a similar library (QCad dxflib).
This library already includes routines to write: circles, lines and polylines.
It is easily expandable. Use reference manual "Autocad 2012: DXF Reference" (PDF) to add needed DXF entities.
The library is LGPL or MIT. If you have modifications or additions, please let me know or contribute directly to Git.

  Git repository:
       https://github.com/okosan/XDxfGen

  Download link:
       git clone https://github.com/okosan/XDxfGen
       previous library and sample source code (zip): Source_XDxfGen - version 0.3 - 14.0 KiB

Support: comment here for any questions. Or use git contacts. Or write to e-mail:

Sunday 24 July 2011

SETI Astropulse on AMD/ATI GPU (Radeon HD 5000 and 6000 series)

It was reported on Lunatics web site that they were able to develop ATI version of Astropulse 5.05.
However instructions granted only for advanced users and the forum is not working now (site is read-only).
Update from 31 July 2011: As it appeared, there is an automatic installer for BOINC from Lunatics here. It will install optimized clients for Astropulse and Multibeam for CPU and AMD/ATI GPU.
Below are the steps for manual installation.
Therefore, this page provides step-by-step installation instructions.

Prerequisites (for each computing host):
1) You must have BOINC installed.
2) You must be connected to SETI@home
3) You must have AMD/ATI Radeon HD 5000 or 6000 series installed and active (for example, I'm using Radeon HD 6850)

Installation steps:
1) Close the BOINC manager. (Tray icon -> right click -> Exit. You will not probably need to stop all active computing processes, however, it is recommended.)

2) Go to lunatics download page and download file from their mirror.

3) Open the BOINC installation folder (for example and below the path C:\Program Files\BOINC is assumed)

4) Open Data->Projects->setiathome.berkeley.edu (full path will look like:
"C:\Program Files\BOINC\Data\Projects\setiathome.berkeley.edu") - this is a SETI project folder.

5) Extract downloaded archive (ap_5.06_win_x86_SSE2_OpenCL_ATI_r521.rar) to the SETI project folder. Extracted files must be located in the SETI project (without any folders) so that their path is:
  1.  C:\Program Files\BOINC\Data\Projects\setiathome.berkeley.edu\ap_5.06_win_x86_SSE2_OpenCL_ATI_r521.exe
  2.  C:\Program Files\BOINC\Data\Projects\setiathome.berkeley.edu\ap_5.06_win_x86_SSE2_OpenCL_ATI_r521.pdb
  3. C:\Program Files\BOINC\Data\Projects\setiathome.berkeley.edu\AstroPulse_Kernels_r521.cl
6) Download the following file app_info.xml (File->Save As after opening in your browser) and copy it into SETI project folder too:
    "C:\Program Files\BOINC\Data\Projects\setiathome.berkeley.edu\app_info.xml"

7) Go to AMD Support&Drivers download page and download latest Catalyst driver package (AMD Radeon™ Video Card Drivers). For example:
    Windows XP - 32 bit
    Windows Vista and 7 - 32 bit
    Windows Vista and 7 - 64 bit

Anyways we are looking for the newest driver supporting OpenCL (GPU computing platform).

8) Install or update with the downloaded driver. Reboot if requested.

9) Start the BOINC manager manually. (Start menu->Programs->BOINC->BOINC Manager)

10) Go to the Projects tab. Select Seti@home, then click "Your Preferences" button in the bottom left button group ("Web sites"). This will lead you to the Project preferences. (Alternatively open page). Log in and edit SETI@home preferences.

11) Make sure the option "If no work for selected applications is available, accept work from other applications?" is checked. Update preferences

12) Go back to your BOINC Manager window. On the Projects tab, select Seti@home and press Update in the Commands button group on the left.

Sooner or later your host will download tasks for Astropulse 5.05 (my received immediately). One AP workunit is processed in about 60 minutes on Radeon HD 6850.
 Computed workunit will appear as the following on an Account Tasks page:
Computed Astropulse workunit example (Radeon HD 6850)
Explanations:
This showed how to perform anonymous platform installation for BOINC. The downloaded package runs multiple OpenCL kernels on your GPU (source file is the AstroPulse_Kernels_r521.cl). It will be hard to use computer while GPU is computing, so make sure to disable the "Use GPU while computer is in use" option in the BOINC Tools->Computing Preferences. According to the source code, the memory requirement is up to 128 MB of GPU RAM.

Questions:
Any questions comment here or ask at the SETI message board thread (which seems to be active).

Friday 15 July 2011

Fuzzy logic control sample application

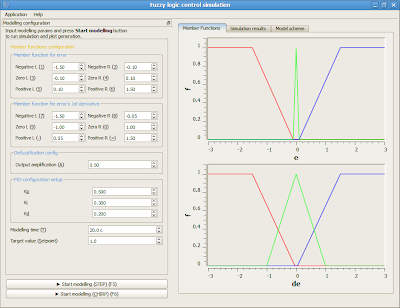
The following application simulates control of an object using configurable fuzzy logic controller. Its database of rules and object transfer function is currently hardcoded. However there's an option to configure everything else of the fuzzy logic controller (FLC - refer to wikipedia).
Here's the main window at start up:
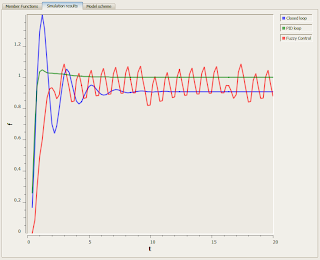
After simulation run, the transition process may be seen on a Simulation results page:
The output plot draws modelling results for closed loop run (without control), PID control (with customized parameters) and FLC configuration.
This FLC implements simplest behavior. However, the source code is open for modifications (download links below).
    Some functionality is still missing (chirp signal input, simulated error plot and plot for derivative of error, etc.).

Source code is written in C++ (mingw) + Qt SDK 1.1. Plots are drawn with Qwt project QwtPlot widget. Application is open source MIT or LGPLv3.

  Download link:
       application archive (zip): Public_XCtrlFuzzy - version 1.0 [Win32/i386] - 4.34 MiB
       source code (zip): Source_XCtrlFuzzy - version 1.0 - 7.79 MiB

Wednesday 6 July 2011

Joystick test application (Qt + DirectInput8) [Windows]

  This application is provided to test joystick output using DirectInput8. It reports the axis positions, as well as the buttons' state.

  Download link:
       application archive (zip): Public_QtJoystick - version 0.2b [Win32/i386] - 4.53 MiB
       source code (zip): Source_QtJoystick - version 0.2b - 292 KiB

    It will be later used in my OGL6 tank game and robot simulation (which is based on the game's engine). Any suggestions, questions and comments are welcome. It is distributed under the LGPL or MIT license on your choice.

    It is written with Qt SDK 1.1 & QtCreator 2.1. Source code is available for download and use under the LGPLv2 or MIT license.

  Usage:
1) Download Public_QtJoystick .zip archive
2) Unpack it with windows zip unpacker or any archive tool (like 7-zip) to any directory
3) Plug in the joystick (if it isn't plugged yet)
4) Run QtJoystick.exe

Sunday 17 April 2011

StarCraft Network Launcher for Hamachi

  StarCraft is known to have issues when playing on LAN or VPN (like Hamachi VPN) on a computer with multiple networks enabled at the same time. Also StarCraft looses palette at start up on newest Windows Vista and Seven due to display subsystem changes (and DirectDraw changes). To fix network ambiguity problems it is recommended to run StarCraft with ForceBindIP command line tool. To fix palette problems on newer Windows there are some tricks discovered by users.
  To ease and combine all these in one solution I have written a simple StarCraft launcher (which can be used with other similar applications as well).

  Download link:
       application archive (zip): Public_scxLauncher - version 0.8b [Win32/i386] - 4.66 MiB
       source code (zip): Source_scxLauncher - version 0.8b - 146 KiB

  Previous versions:
       application archive (zip): Public_scxLauncher - version 0.7b [Win32/i386] - 5.67 MiB
       source code (zip): Source_scxLauncher - version 0.7b - 21.2 KiB

  It is still beta and I will be very thankful for suggestions and comments (the mail is below). It is distributed under the GPL, LGPL or MIT license on your choice.

  This launcher is dependent on ForceBindIP (website is http://www.r1ch.net/stuff/forcebindip/) and includes its package inside (my launcher will install ForceBindIP itself, just run it with administrator rights).

  The Launcher is written with Qt SDK 1.1RC & QtCreator 2.1. Source code is available for download and use under LGPLv2 and MIT license.

  In future versions I will add a DirectDraw registry fix to improve SC's palette stability.

  Usage:
1) Download launcher Public_scxLauncher .zip archive
2) Unpack it with windows zip unpacker or any archive tool (like 7-zip) to any directory (non-desktop directory, please. Make sure the directory is write-enabled).
3) Run scxLaunch.exe
4) If your StarCraft is not installed properly, you should browse (Enter key or "..." button) to search for starcraft.exe

5) If you have Hamachi network, it will be detected automatically. Otherwise, select any desired network from network combo-box. (Select from list)
6) If you have Windows Vista or Seven - select needed flags (like Add firewall exception, application compatibility, palette tricks, and run as administrator flags - they are selected by default).
7) Press F5 or Launch! button to start game.
8) All launcher settings (after Launch or Cancel) are stored in config.txt, which is parsed at start up.

9) In case of any questions, please, comment below.

Update from 6th July 2011: new version 0.8b is available. Links updated (above).
Update from 2nd May 2011: primary download link is temporarily unavailable (up to 7th May).

Friday 28 January 2011

Building and installing ODE for Visual C++ 2008 / 2002 / 2005 / etc

This is a small step-by-step instructions to make your ODE compile in MSVC 2008 (2002+).
Complete printer-friendly ODE manual can be found here.
1) First, download the latest ODE package from SourceForge (I've downloaded ODE ver. 0.11.1)
2) Unpack package .tar.bz2, .zip or .tar.gz with, for example 7-zip (I've unpacked it to E:\Projects\SDK\ODE\ode-0.11.1). Try avoiding spaces in the path.

3) Go to build dir and create shortcut to premake4.exe (Quick Start Guide to Premake4.3,User guide). Open shortcut properties and type vs2008 (for VStudio 2008) after the name premake4.exe, so it will look like this: "\ode-0.11.1\build\premake4.exe vs2008" (without quotes). For Visual Studio 2005 - type vs2005, and vs2002 for Visual Studio 2002.
Tip: There is no such option like vs2010 for latest studios, so you have to choose maximal available solution version like vs2008 and then run .sln and apply solution conversion in appeared dialog to make solution compile for you. To get all options for premake, you shall run premake4.exe --help from command line (win+R, type cmd, then CD to your ODE build dir).
4) Go to created folder \ode-0.11.1\build\vs2008 and open solution ode.sln
5) If you have solution configuration toolbox opened, you will notice DebugDoubleDLL configuration selected by default at start up. These configurations will be determined by the way you would like to use your project. I'm trying to use static linking most of the time to minimize dependencies and total executable size, so my choice is DebugSingleLib configuration. I have chosen single precision because of speed required, - double precision will decrease ODE computational speed 2-5 times (since you will lost SSE optimizations this way), but if you need better convergence and precision, - the Double configuration is your choice. Anyways, the Single precision configuration will be slow in debug mode, since optimizer will be turned on only in Release mode.
6) Build your solution (Build->Build solution).
After build, a lot of .obj files will be generated inside solution dir (e.g. "ode-0.11.1\build\vs2008\obj\DebugSingleLib").
But, in case of static linking, you will need the only one .lib file, placed inside "ode-0.11.1\lib\DebugSingleLib\ode_singled.lib"
You will add this path to your linker when making your project later.
7) Now, it would be nice to make also a Release build. So, change project configuration to ReleaseSingleLib. But do not haste to build it now. First, check if project configuration is correct - ODE project properties->C++->Code Generation page. Look at Runtime Library field, - it is highly required for you to make sure it is the same as in your Release project configuration (the project, where you would like to use ODE). If you just left it as it is - "Multi-threaded DLL" - your release project will require "Visual studio 20xx runtime" installation from end-user, which is not good.
Tip: In all of my release project configurations I always change this option to "Multi-threaded (/MT)" (and also when building any other library from sources like OpenCV, Qt, qwt etc.). /MT configuration might also be little bit faster than dynamic, but this is not just that simple question.
Also check if you would like using SSE or SSE2 with ODE. I always choose "Streaming SIMD Extensions (/arch:SSE)" in Enable Enhanced Instruction Set field, since SSE2 does not give much more speed for my machine. If you strike for performance, you shall do a little benchmarks for it later. Also change Floating point model to Fast, to make sure SSE will not conflict with precise configuration. Now, build release configuration. As previously, you will get alot of .obj files, and in case of successful build, - go to ode-0.11.1\lib\ReleaseSingleLib to check if ode_single.lib is generated for your release build config.

8) Now it is time to test your project working with ODE. Create new or open an existing Win32 or Console application.
9) Set debug configuration, in Project Properties->C/C++-> Additional include directories add full path to ODE include directory (e.g. "E:\Projects\SDK\ODE\ode-0.11.1\include" in my case). Go to Linker->General page and add directory for your debug library (e.g. "E:\Projects\SDK\ODE\ode-0.11.1\lib\DebugSingleLib"). In Linker->Input->Additional Dependencies field type ode_singled.lib.
10) Do the same for your release configuration, except place another linker path for release library ("E:\Projects\SDK\ODE\ode-0.11.1\lib\ReleaseSingleLib") and input library ode_single.lib. Now it is right time to check if C/C++->Code Generation-> Runtime library is the same in runtime version as was in ODE when you compiled it, - in our case it must be /MT.
Notice: to use different runtime libraries configuration in several projects, you have to use dynamic linking, and also ignore conflicts in Linker-> Ignore Specific Library (just type there a library that brings conflict). Also, it would be great to check if debug library is the same as in ODE debug build configuration.
11) Open your main header file, or precompiled header like stdafx.h and write to the end:
#include <ode/ode.h>
#include <windows.h>  // you might also include windows for timing functions
12) In the beginning of your main function (main(), t_main(), WinMain(), etc)
write single line:
dWorldID odeWorld = dWorldCreate();

and rebuild your project's solution. Make sure it builds successfully.
If you have compiler error, like undefined symbol dWorldCreate - make sure to include ode.h headers properly and add ODE include path to your solution like in step 9.
If you get some unresolved external symbol error, go to step 9 and retry it.
If problem still unsolved, go to step 3 and rebuild ODE debug config.
If you get some multiple definitions linker errors - check steps 7 and 9 for C++ runtime library /MT.
In a later article I will write about how to start using ODE in a game-like application and will give some tips.

Saturday 23 October 2010

Stereo vision camera system

Here is a camera module for ITE. Two fast web cameras Philips 2050nc (up to 90 FPS @ 640x480, 6 FPS @ 1600x1200, 20 FPS @ 800x600), with very low-noise images is a good/cheap choice for computer vision. Both cameras are mounted on pitch aluminium plate connected to a geared stepper motor MP35EA (12V, 92mA, 4-Phase bipolar, gear ratio 1:85, torque = 0.4 kg*cm = 5.6 oz-in). The inter-lens distance is 0.12 m = 4.725 in) - picture on the left. Since the right camera is rotated by 180°, the software rotation of captured images is required. 
The test platform (right picture) can also perform rotation by the vertical axis (stepper motor, bipolar, 24V, 0.5A). Since there is no slip ring for USB cameras' data transfer, the expected yaw angle is ±230-270° (some experiments required), the horizontal rotation angle is -85°..+110° (0° - horizontal line).
All my control boards are designed for a closed loop control (feedback angle is measured by optical sensor and corrections applied after each motor step if required). The pitch rotation motor does not have a secondary shaft, so the feedback wheel will be mounted on a plate's output shaft and a sensor will be mounted from the side. Bottom motor has a secondary shaft, so encoder wheel is mounted thru the special shaft coupling (on picture below the wheel is not yet installed).

I will describe a sensor system in details in next posts, when demonstrating a camera movement control and a video capture. Below there is a mounting place for a sensor (optical interrupter TCST1103/1202).

I'm planning to publish here run tests of my application (OpenCV+Qt) for image capture and disparity map generation within 4 weeks.
Currently I'm busy on programming (upgrading) my parallel neural network application (also using GPU /w OpenCL). I will post results and an application here about it within two weeks.

ITE::System modules scheme

Preliminary design of ITE's components interconnection.

Currently I have only a 180W DC-ATX power supply, but I will be able to add more power later (by parallel usage of several DC/DC converters). I have the only motion motor control module currently in alpha-stage, but it's working well. The control system's data storage will use one HDD (for archiving data, a lot of space is required) and one SSD (for system - Linux). Similar installation showed the successful start up with Windows XP as primary OS. A mid-end GPU (180 W peak approx.) will be used for computationally intense highly parallel computer vision tasks and image processing (preferably OpenCL-based). Computer vision tasks are foreseen to have better (computing power)/(consumed electric power) ratio on GPU as compared to multicore CPU. Also, near real-time image processing will probably show up as hard-to-implement.

Thursday 24 June 2010

ITE robot project:: Beginning

Currently I'm involved in development of a rover-kind robot project and hope that I'll be able to publish it's photos soon. I will write a small annotation for the beginning.
Few years before, I've decided to apply my knowledge of MCU in practice. I've made a lot of small testing devices, and the best way to achieve higher skills was to start development of large robotic project. Popular Martian rover robots have captured my interest of making something similar. So, I've decided to construct large 6-wheeled robot with highly advanced artificial intelligence. Using normal PC boards will result in low-cost computing power, so the robot must be large enough to contain it. Also there must be enough space for capatitive batteries. I assume normal operation time, without solar charging, should be 5-7 hours. Here is a photo of ITE for the beginning (top view):The codename ITE stands for Intellectual Terrain Explorer. Later I will write something about schemes and modules of ITE. On photo you can see plastic packs with red batteries inside - these are Li-Ion modules 22.2V each, composed from laptop batteries of 11.1 V. All these six packs (three of them are under the motherboard) can provide up to 645 W*h of energy (up to 7-8 hours uptime to total discharge). Each wheel of rover can be driven and rotated separately with the help of total 12 motors (6+6 for turning/running). You can see a turning DC motor already attached on the left bottom corner of picture. The entire armature of the robot is made from Titan - this will guarantee a low weight and high strength (if properly welded). Currently in physical construction and design one mechanical engeneer involved, who gives me advices when I'm making modules and electronics.
I hope to involve more people to this project, because it is going to be open-source solution.
P.S.: The rover project was started nearly in October-November 2008.


More technical info about design will be available later. I will try to post here as regular as possible.
Locations of visitors to this page